Gate Install: A Homeowner’s Guide to Gate Types, Costs, and Professional Installation
Planning a gate install on your Tampa property involves more than picking a style — gate type, material, and automation drive cost, durability, and code compliance. This guide lays out common driveway and pedestrian gate options, realistic installed cost ranges, permitting and site requirements for Hillsborough County, and a contractor checklist so you can budget and hire with confidence. Youll also get Florida-specific advice on salt-air corrosion, maintenance expectations, and when a professional installer is the smarter, safer choice.
Gate Types and Where Each Works Best
Choose gate type based on site constraints and use case, not just looks. The single biggest installation mistake I see is picking a style that clashes with the driveway geometry—then spending twice as much to retrofit foundations, automation, or clearance.
Type-by-type practical guide
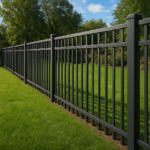
- Swing gates (single or dual): Best for level driveways with room to swing; cheaper to install but need clear turning radius and sturdy posts. Trade-off: heavier materials demand stronger operators and deeper footings in sandy Florida soils.
- Sliding gates (tracked): Good where there is no lateral clearance for swing gates; track sits on the ground and requires regular cleaning in leaf/debris-prone yards. Limitation: tracks collect grit in coastal settings and need more maintenance.
- Cantilever sliding gates: Preferred where debris, rodents, or uneven surfaces make a ground track impractical. They cost more and need a longer clear-span counterweight area behind the opening, but perform better on sandy or washout-prone lots.
- Bi-fold and vertical lift gates: Niche solutions for very tight horizontal clearances or steep driveways. Expect higher mechanical complexity and sympathetic maintenance needs—use only when other types are infeasible.
- Pedestrian gates and estate gates: Integrate with fencing and should match lockset and hardware standards for access control; ADA access and swing direction matter for public-facing entry points.
Material and opener interaction matters almost as much as gate type. A heavy wrought iron swing gate will drive you to a commercial-grade opener and reinforced masonry posts; an aluminum sliding gate can use a lighter sliding operator and smaller footings. In Tampa Bay, factor salt air and humidity into that choice—aluminum reduces long-term corrosion headaches.
Practical installation trade-off to expect: Sliding and cantilever gates reduce the need for swing clearance but increase foundation and hardware cost. Swing gates are simpler and cheaper up front, but poor site planning turns them into a daily annoyance or a safety hazard.
Concrete Example: A suburban Tampa home with a 12-foot-wide driveway and mangrove-lined curb has tight street-side clearance and intermittent sand wash onto the driveway. A cantilever sliding gate with an aluminum frame is the sensible choice—it avoids a ground track that would clog with sand and lets you use a lighter, coastal-friendly material. Installation requires a longer counterweight zone behind the gate and a deeper concrete foundation because of the sandy soil.
What homeowners often misunderstand: People assume a sliding gate is always more durable; in practice, a poorly supported cantilever will sag and stress the opener. Quality of foundations, correct post-setting for swing gates, and choosing the right operator for gate mass are where projects fail—not the style itself.
Materials Compared: Aluminum, Steel, Wrought Iron, Wood, Vinyl, and Composite
Material choice sets the clock on maintenance, cost, and what opener you can realistically use. In Tampa Bay, that decision is as much about salt, humidity, and sun exposure as it is about style. Pick the wrong substrate and you pay for it in corrosion, warped boards, or a premature operator failure.
| Material | Corrosion/Weather Resistance | Relative Weight | Maintenance Reality | Best Use Case |
|---|---|---|---|---|
| Aluminum | Excellent with powder coat; resists salt air | Light | Low — rinse and touch-up coating as needed | Coastal sliding or swing gates where corrosion is a concern |
| Galvanized/Steel (powder-coated) | Good if properly galvanized and coated; vulnerable at welds and cut edges | Medium to heavy | Medium — inspect coatings, touch-up paint, treat rust spots early | Ornamental, high-strength gates when aesthetic and strength required |
| Wrought Iron / Mild Steel (ornamental) | Poor without aggressive maintenance; traditional look but high corrosion risk | Heavy | High — repaint every few years, sand and inhibit rust | High-end decorative gates where appearance outweighs upkeep |
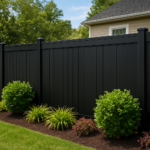
| Wood (cedar, pressure-treated pine) | Prone to rot and swelling in humidity unless sealed regularly | Medium | High — staining/sealing every 2-3 years, check for rot at posts | Privacy gates and traditional looks where warmth is desired |
| Vinyl (PVC) | Very good against rust; can discolor and has thermal expansion | Light | Low — wash, inspect fastenings; limited repair options | Low-maintenance pedestrian gates and modest driveway gates |
| Composite (wood-plastic blends) | Good resistance if high-quality; inferior products can delaminate | Medium | Low-to-medium — clean, inspect fasteners; harder to refinish | Privacy look with lower maintenance than full wood; limited custom metalwork |
Practical trade-off: aluminum buys corrosion resistance and lighter operators at the cost of less raw strength and a narrower range of ornamental profiles. Wrought iron gives the visual weight and can be repaired piecewise, but in practice the repainting and rust control make it the most expensive over a 10- to 15-year horizon.
Real-world application
Concrete Example: A homeowner on a Pinellas County inlet wanted the look of decorative iron but disliked yearly repainting. We specified a powder-coated aluminum frame with cast iron-style pickets and a marine-grade finish, then matched a medium-torque sliding operator that handles the lighter weight. The result preserved the aesthetic with a fraction of the long-term corrosion risk and allowed a smaller concrete footing than an iron gate would have required.
- Maintenance actions by material: Annual rinse and inspect for aluminum; touch-up powder coat chips for steel/iron; stain and check post bases for wood every 2–3 years; clean vinyl and check fasteners annually; inspect composite edges and seams for moisture intrusion.
- Electrochemical caution: Avoid direct steel-to-aluminum contact without dielectric barriers — galvanic corrosion is common where mixed metals meet in salt air.
- Wind and code constraint: Lightweight vinyl and aluminum may need additional reinforcement or closer post spacing to meet local wind-load requirements; ask local gate installers for shop drawings if you are in a high-wind zone.
Next consideration: after you pick a material, the next technical choices are finish system, fastener metallurgy, and foundation sizing — those three determine whether the gate survives Tampa conditions or becomes a recurring repair item.
Realistic Cost Breakdown for Gate Install
Start with foundations and the operator — those two line items will consume the biggest share of your budget. In practice a gate project breaks into predictable buckets: concrete and footing work, the gate structure itself, hardware and fasteners, automation and electrical, labor, shipping/custom fabrication, and permits/engineering. Treat the finished quote as a stack of those buckets and judge bids against percentages, not just a single bottom-line number.
Typical budget distribution (rule of thumb): gate materials 30–45%, labor 20–30%, automation/electrical 10–25%, foundations and site prep 8–18%, hardware and shipping 3–8%, permits/design 1–5%. These are planning guides, not quotes; coastal sites shift foundation and corrosion-control costs upward.
Practical trade-offs that change price
Key trade-off: spend on a heavier gate and you must spend again on a stronger opener and deeper footings. Conversely, choosing a lighter material like aluminum reduces opener and foundation costs but limits ornate profiles and may require reinforcement for high-wind ratings. Also, underestimated site prep — buried roots, washout-prone sand, or unseen utility lines — is where low bids fail in real life.
Concrete Example: A 16-foot aluminum cantilever sliding gate on a sandy coastal lot with a coastal-rated LiftMaster opener, stainless mounting hardware, and a deeper reinforced footing typically lands around $8,200 to $10,500 installed. That price reflects heavier foundation work for sand, a marine-grade powder coat, a mid-range opener with battery backup, and 2–3 days of crew time for setting, alignment, and wiring.
Concrete Example: A 12-foot ornamental steel dual swing gate with keypad/intercom, galvanized and powder-coated finish, reinforced masonry posts, and a commercial swing operator commonly finishes near $9,500 to $13,000 installed. The higher end factors in corrosion-prep at welds, a longer warranty package, and HO A documentation prep if required.
- What should be itemized on the estimate: gate frame and panels, opener brand and model, concrete footings (yards of concrete), electrical work or conduit, safety devices (photo eyes, edges), hardware/fasteners and finish, shipping and lead time, permit fees and who pulls them, labor hours and warranty.
- Common hidden costs to watch for: trenching for electrical, engineered drawings for heavy gates, corrosion upgrades (stainless fasteners, sacrificial anodes), HOA-required finishes, and expedited shipping for custom gates.
Judgment you need up front: a low headline price that omits a concrete footing or uses standard steel fasteners on a coastal lot is false economy. I've seen projects where the installer skipped engineered footings to hit a low bid — the gate sagged within two years and the owner doubled down on repairs that exceeded the original quote. Always confirm footing depth and fastener metallurgy in writing.
Automation Options, Brands, and Safety Requirements
Automation changes the project from carpentry to systems work. Choosing an opener is not a styling decision — it dictates electrical scope, safety devices, and long-term service needs. The most common installer error is undersizing the operator for gate mass and wind load; that kills gearboxes and shortens service life.
There are three practical operator families: above-ground swing operators (reliable, serviceable), sliding gate gearboxes for tracked gates, and underground or subterranean operators (clean look but complex to maintain). Underground units look tidy but keep in mind they sit in a wet, salty pocket — they need drainage plans and are more expensive to replace.
Brands and how to pick them
Pick a brand with local support and readily available parts. LiftMaster, FAAC, Genie, and Nice are commonly used by reputable local gate installers because technicians and replacement parts are available in-market. Practical judgment: prefer a known opener model with a documented torque range you can match to the gate weight and wind-rating on the shop drawing; avoid cheap import units with unknown service networks.
Safety equipment is mandatory and enforceable. Installers should supply and test photo eyes, monitored safety edges (on swinging leaves), vehicle loop detectors where the gate closes on cars, and a clearly labelled manual release. Follow UL 325 practices and document functional tests — that documentation is the difference between a warranty claim and a liability exposure.
Electrical work for an automatic gate frequently triggers a permit in Tampa Bay. If the project includes fixed conduit, hardwired intercoms, or a dedicated circuit you will likely need an electrical permit — check local requirements at Hillsborough County Building Permits. A licensed electrician should pull permits and handle the feed; expect them to size conduit for future battery backup and surge protection.
- Installer automation checklist: Provide opener brand/model, gate mass and wind-rating matched to torque, photo eyes and safety edges, loop detector or vehicle sensor where needed, battery backup and surge protection, wiring diagram, and a signed safety test report.
- Network/integration trade-off: Smart phone access and Wi-Fi convenience increase attack surface; prefer cellular intercoms or segregated guest networks and change default credentials.
- Serviceability trade-off: Concealed underground operators reduce visibility but increase service time and replacement cost; above-ground gearboxes are easier and cheaper to repair.
Concrete Example: A rental property in South Tampa needed tenant access without sharing keys. We installed a tracked sliding operator from a known brand, added a loop detector for reliable vehicle sensing, and a cellular intercom to avoid running low-voltage lines across the driveway. The system includes a 24-hour battery backup so the gate remains operable during short outages and a documented UL-style safety test signed at handover.
Important: insist the installer performs and leaves written record of the UL 325-style safety test and shows you manual release operation — verbal assurances are not sufficient.
Next consideration: confirm who pulls permits and whether the quote includes an electrician and the UL-style safety test — if that responsibility is vague, budget for it or insist it be clarified before work starts. For local help and documented safety checks, request an on-site estimate from a local pro such as Vilo Fence.
Step-by-Step Professional Installation Process and Timeline
Professional gate install proceeds in distinct phases and should be scheduled, not ad hoc. A competent gate installer sequences surveys, permitting, foundation work, hardware fitting, automation wiring, and safety testing so each step feeds the next without shortcuts that create failures later.
Installation phases and realistic time windows
- Site survey and utilities check – 1 day to 1 week. Installer measures geometry, checks slope, locates buried utilities, and records soil type. Insight: have utility tickets marked before the visit to avoid surprises.
- Design, shop drawings and HOA paperwork – 1 to 14 days. Shop drawings show footing depth, wind load notes, and opener spec. Submit HOA packages in parallel if required.
- Permitting and engineering sign off – 1 to 6 weeks. Timelines vary. In Tampa Bay expect at least a couple of weeks for routine permits; complex sites or flood zone work can add time. Check Hillsborough County Building Permits.
- Site prep and foundations – 2 to 7 days plus concrete cure time. Dig footings, install rebar, pour concrete and allow specified cure time. Tradeoff: pushing installation before proper cure increases risk of post movement and gate sag.
- Structure setting, hardware and track work – 1 to 3 days. Set posts, weld or bolt frame, install rollers or cantilever rails. Level and square are non negotiable here.
- Automation wiring and device installation – 1 to 3 days. Electrician runs conduit, installs opener, photo eyes, loop detectors and manual release. Permit inspections often occur during or after this stage.
- Alignment, safety testing and client handover – 1 day. Functional tests, safety edge verification, and a written test record signed by installer. Installer should demonstrate manual release and supply operator manuals.
Practical insight – parallelize work where safe. While permits are pending, order long lead items like custom powder coated panels and the opener. That reduces total calendar time but only work with suppliers and installers who commit delivery dates in writing.
Common delay sources and mitigations. Expect the biggest slippage from HOA approvals, permit inspections, or unexpected soil conditions. Mitigate by requesting a pre-bid site scan for utilities, asking the installer to include engineered footing depths in the quote, and confirming who handles permit pulls – the installer or a subcontracted electrician.
Real-world example: For a 12-foot aluminum sliding driveway gate on a sandy coastal lot the schedule we follow is usually: site visit day 1, shop drawings and HOA package 1 week, permit approval 2 to 3 weeks, footing excavation and pour followed by a 3 day cure, gate install and wiring 2 days, and final safety test 1 day. Total practical window is 4 to 8 weeks with the longer end driven by permitting and material lead times.
Insist on documented cure times for concrete and a written safety test report. Shortcuts at these points are where most post install failures begin.
Final judgment: the installer who controls the timeline coordinates subtrades, documents cure and safety tests, and owns permit follow ups. If a bid promises a two day turnaround for a heavy gate with concrete footings, treat that as a red flag and ask for written sequencing and cure requirements before you sign.
How to Choose a Installer: Questions, Red Flags, and Quote Comparison
Hire for predictability, not price. The most useful trait in a gate installer is the ability to describe and own the unknowns on your property: footing depth for sandy soils, corrosion mitigation for coastal sites, who is responsible for permits, and how safety testing will be recorded.
Contract Essentials and What to Verify
Key contract items to demand in writing: a clear scope that lists footings by depth and diameter, opener brand and torque rating matched to gate weight, responsibilities for permits and inspections, payment schedule tied to milestones, and a defined warranty period that separates labor from manufacturer coverage.
- Questions to ask on site: Have you installed this material and opener in coastal Tampa? Who pulls permits and which trades will be subcontracted? What is the expected concrete mix, rebar spec, and cure time? Can you show recent local references and photos of finished installs? What is your change order policy?
- Service and parts: Ask about local service capacity, typical response time for repairs, and where replacement parts are sourced. If the installer cannot name a local service partner or give a parts lead time, that is a practical risk.
- Financial terms to watch: Avoid full payment up front. A reasonable schedule is deposit, post-footing, post-install, final after safety test and permit signoff.
Tradeoff to accept: A higher bid that includes engineered footings and stainless fasteners will cost more now but costs less over a decade than a cheap install that corrodes or sags. In coastal projects this is not an optional upgrade.
Warning Signs that Mean Walk Away
- Refusal to perform a site visit yet promising a firm price.
- One line estimates with no footing, opener, or wiring details.
- Uninsured crews or no proof of licensing for electrical subtrades.
- Pressure to pay cash outside a documented contract or escrow.
- No written safety test record or avoidance of UL 325 style documentation.
| Comparison Field | Bid 1 | Bid 2 | Bid 3 |
|---|---|---|---|
| Total price | Low – corners cut | Mid – balanced | High – premium components |
| Opener brand/model | Unspecified generic | LiftMaster mid torque | Underground Nice with service plan |
| Footing description | Shallow concrete, no rebar spec | Engineered footing, rebar and depth listed | Engineered deep footing, corrosion detailing |
| Permits | Buyer to arrange | Installer pulls permits | Installer pulls permits and provides filings |
| Warranty (labor/material) | 1 year labor, vague parts | 3 year labor, manufacturer warranty detailed | 5 year labor, extended manufacturer coverage |
| Local references | None provided | 3 recent local installs | 5 local installs, HOA packages shown |
| Service SLA | No commitment | 48 hour response | 24 hour response, stocked parts |
Concrete Example: A homeowner requested three bids for a coastal 16 foot sliding gate. The cheapest bidder omitted stainless fasteners and specified a generic opener. The mid bid listed a LiftMaster with engineered footings and included permit pulls; that installer also provided three recent Tampa references and a 72 hour service commitment. The owner selected the mid bid and avoided early corrosion and a repeat repair within 18 months.
Next consideration: before you sign, confirm who will perform the UL 325 style safety test, how it will be documented, and whether the final payment is contingent on passing that inspection.
Maintenance, Troubleshooting, and Long Term Costs
Long-term cost is mostly maintenance and failures, not the original gate install. Over a 10-year span you will spend money on corrosion control, moving-part replacement, and occasional electrical work; those predictable items determine whether your gate is an asset or a recurring headache.
What to do yourself vs when to call a pro. Homeowners can handle visual inspections, track and roller cleaning, touch-up paint for small chips, and basic lubrication of exposed hinge pins and roller bearings. Do not open the operator housing, reprogram safety limits, or attempt major rewiring; that work requires a licensed electrician or certified gate installer because of safety and code compliance.
- DIY checks (quarterly): clear debris from tracks, wipe salt spray from metal, torque-check visible fasteners, and cycle the gate to listen for new noises.
- Call a pro when: you see binding in the swing path, the opener stalls under light load, control boards show water damage, or photo eyes need complex alignment and wiring fixes.
Troubleshooting common failure modes and reasonable first steps. If the gate becomes noisy or jerky, clean the rollers and re-grease bearings first; noise that persists usually means worn rollers or a misaligned frame that a technician must correct. If remotes work intermittently, check battery and reprogram the transmitter; persistent dropouts can be RF interference or a failing receiver module. For underground openers, look for water pooling at the housing — drainage and gasket replacement are typical fixes before electronics replacement.
Cost buckets for maintenance (practical guidance, not a formal quote). Small preventive items like cleaning, touch-up paint, and consumables are typically under a few hundred dollars annually. Mechanical repairs such as new rollers, hinge pins, or track alignment are mid-range; expect several hundred dollars plus labor. Major repairs — motor replacement, underground unit rebuild, or post replacement due to corrosion — move into the high hundreds or low thousands. Budgeting for these categories makes surprises manageable.
Concrete Example: A South Tampa owner let powder coat damage at a hinge go untreated. Within two years the hinge stud suffered corrosion that wore the bushing and introduced play in the leaf. Repair required a hinge assembly replacement, a local welder to recondition the post, and finish work — roughly $1,200 in parts and labor. A $120 annual inspection and touch-up would have prevented the failure and extended the hinge life by several years.
Practical judgment you need: corrosion control and operator upkeep matter more than ornate finishes. For coastal projects insist on corrosion-specified fasteners, dielectric isolation between dissimilar metals, and a documented service schedule from your gate installer. Cheap installs commonly under-specify these details and create higher total cost of ownership.
Next consideration: set a simple maintenance contract or calendar at handover with your installer that lists inspection dates, expected consumable replacements, and response times for failures. That single step reduces reactive emergency costs and preserves gate value over the long run.
Permits, HOAs, and Florida Specific Considerations
Don’t assume a gate is just carpentry — the paperwork is as likely to stop your project as a bad footing. Skip HOA approvals or a county permit and you’ll either be forced to undo work or pay for corrective fixes. Treat approvals as part of the schedule, not an afterthought.
What typically triggers a permit in Tampa Bay. Automation that requires wiring, any fixed electrical equipment, changes to a driveway or curb cut, installing posts deeper than shallow anchors, and work inside regulated flood zones commonly require a building or electrical permit. Check local rules at Hillsborough County Building Permits early in planning so you know which filings are mandatory.
HOA approvals and how to avoid rework
HOAs want drawings, finishes, and hardware details — not a sketch. Most architectural committees expect elevation drawings, material samples or photos, color specs, and often the opener model if automation is planned. Submit these items up front. If your installer fabricates a custom gate before HOA signoff you risk repainting or refabrication to meet CC&R requirements.
Concrete Example: A South Tampa homeowner paid for a custom powder-coated iron look before HOA approval. The HOA required a different picket profile and a lighter finish; the owner absorbed the cost to rework panels and repaint. If the installer had submitted shop drawings first, the delay would have been minor and the wasted fabrication avoided.
Flood zones, setbacks, and easements create technical constraints most homeowners miss. If your lot is in a flood-prone area you will face elevation, corrosion, and foundation requirements that influence whether an underground operator is sensible. Public right-of-way or sightline rules can require moving a gate inboard, changing drive slope, or getting a driveway/access permit from the county or DOT.
Practical tradeoff: underground openers look clean but are more exposed to groundwater and salt intrusion in coastal or high-water table areas; above-ground operators are easier to service and keep electrical components higher and drier. For many Tampa Bay properties the small aesthetic compromise of an above-ground unit avoids repeated service calls.
Who should pull permits and handle HOA packages. It is usually cleaner to have your gate installer manage permits and HOA submissions because they prepare shop drawings, footing specs, and opener cut sheets. However some HOAs insist the homeowner be the applicant — confirm that in writing before work begins so responsibility for delays is clear.
Final recommendation: lock down who files for permits and who signs HOA paperwork before any custom panels are cut. If you want to avoid expensive rework, insist on written HOA approval or conditional sign-off and a clear permit plan in the contract — that decision saves time and money on almost every Tampa gate install.
Project Examples and Before and After Scenarios
Real installs expose the trade-offs that matter most: site constraints, hidden prep, and sequencing. Showroom photos hide buried roots, uneven grades, and HOA paperwork that change both method and price.
Residential driveway: aluminum sliding on a sandy suburban lot
Scope and outcome: Replaced an aging wooden driveway gate with a 12-foot powder-coated aluminum cantilever sliding gate, coastal-grade fasteners, and a mid-range, battery-backed opener. Timeline: 1 site visit, HOA approval in 10 days, permit and footing work 3 weeks, install and wiring 3 days. Installed cost range: approximately $4,000–$6,500 (fabrication, reinforced footing for sandy soil, and automation included).
What changed after install: Sand had been clogging a previous tracked gate; the cantilever design eliminated ground track maintenance but required a larger counterweight zone behind the opening. The homeowner traded a slightly larger footprint for substantially lower daily maintenance.
Estate upgrade: ornamental steel dual swing with access control
Scope and outcome: Converted a bungalow property to a gated entry with a 14-foot ornamental steel dual swing gate, keypad/intercom, recessed masonry posts, and powder-coat corrosion prep at welds. Timeline: 2 site visits for tree/grade coordination, HOA package and permit 4 weeks, concrete and post work 5 days, final install and commissioning 2 days. Installed cost range: roughly $11,000–$16,000.
Real-world constraint: Heavy leaves and overhanging roots required relocating one post 18 inches to avoid root damage and future settlement. That shift added fabrication and a short retaining wall but prevented repeated repairs — a cost up front that saved twice the expense of reactive fixes.
Small commercial: automated cantilever for frequent deliveries
Scope and outcome: A small business needed a robust cantilever gate to handle delivery vehicles and frequent cycles. We installed reinforced steel subframe with a heavy-duty sliding operator, loop detectors, and a cellular access controller for remote management. Timeline: shop drawings and permit 2–3 weeks, reinforced footing and install 1 week. Installed cost range: in the general ballpark of $7,500–$11,000 depending on access control add-ons.
Operational lesson: Commercial applications demand higher duty-cycle components and a service plan. Choosing residential-grade openers for high-frequency use leads to premature failures; specify commercial-rated gear where cycle count is high.
- Site-first trade-off: moving a post to avoid roots or maintain drainage often increases immediate cost but prevents accelerated settling and repeat work.
- Automation timing: adding an opener after installation is usually more expensive than including it in the original scope because of conduit and foundational access needs.
- Aesthetic vs serviceability: underground operators win visually but raise long-term service and water-intrusion risk in coastal or high-water-table sites.
Important: Always document footing depth, corrosion protection at welds, and opener model on the contract. Vague language here is how good projects become recurring problems.
Next consideration: When you request site visits, bring photos of the problem you want solved, note any recurring maintenance issues, and ask the installer to flag the single biggest risk that could double your cost — that candid assessment tells you whether the estimator understands real-world trade-offs.
Next Steps and How Vilo Fence Can Help
Start by turning questions into evidence. Before you call anyone, gather photos, note recurring problems, and set a realistic window for when you want the project done. That one task halves confusion during estimates and exposes the real site constraints that drive cost and timeline.
What to prepare before a site visit
- Photo pack with measurements: take three views of the opening with a tape measure visible in one photo so the estimator doesn’t guess width or clearance.
- Usage notes: how many cycles per day, vehicle types, and any security features you want (keypad, intercom, cellular access).
- Power and wiring snapshot: photo of your electrical panel location and any existing low-voltage runs to the driveway.
- HOA and survey excerpts: a copy of the property survey plus any CC&R sections that mention gates or driveway modifications.
- Budget band and timeline: a realistic price range and target completion month so the estimator focuses solutions to your constraints.
When Vilo Fence arrives expect a measured, documented process: site photos, a soil/grade probe where needed, a check for underground utilities, and finish samples for material and color. We prepare a simple shop drawing and an itemized estimate showing footing specs, opener brand/model, electrical scope, and permit responsibility so you can compare apples to apples.
Practical limitation to accept up front: an on-site estimate is accurate for visible conditions; unexpected findings (hidden roots, utility conflicts, or undocumented easements) trigger change orders. Build a 10–20 percent contingency into your plan and insist the contract defines how changes are priced and authorized.
Concrete Example: A South Tampa homeowner wanted a secure driveway gate but had frequent outages and no conduit run. During the Vilo Fence site visit we documented the panel location, recommended a battery-backed opener and a cellular intercom, and included an electrician line item for conduit. The installed system maintained access during outages and avoided ripping up the driveway later to add conduit.
Get footing diameter/depth, fastener metallurgy, and opener model written into the contract — verbal promises don’t survive the first tropical storm.
If you want next-step logistics: schedule the site visit during a weekday when the driveway is clear, email your HOA excerpts in advance so the estimator can pre-check restrictions, and ask for a phased timeline tied to milestone payments. A coordinated start—documents, photos, and a budget window—lets the installer give a firm, reliable quote instead of a best-guess number.
Next consideration: if your property is coastal or in a high-water table area, prioritize a site visit now because the recommended footing and corrosion upgrades change both budget and lead time materially.