Fence Installation Guide: Costs, Timeline, and What to Expect from Professional Installers
Thinking about fence installation for privacy, security, or curb appeal in the Tampa Bay area? This guide breaks down how costs are built, what a practical timeline looks like, and what professional installers actually handle—from design and permitting to site prep and post-install support. By the end, you’ll know how to budget by material, navigate local permit and HOA requirements, and compare bids so you can make a confident choice.
Budgeting Fence Installation in Tampa: Costs and What Impacts Them
In Tampa, budgeting for fence installation starts with material choice and site realities, not the sticker price you see in ads. Local factors – HOA rules, building permits, and the need to remove an existing fence or regrade for a gate – drive the big swings in total cost. For reference on permits, see City of Tampa permits.
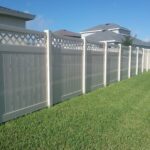
Material choices drive the delta: installed costs per linear foot typically range as follows in the Tampa market: wood privacy fences $8-12/ft, vinyl $15-30/ft, aluminum $20-35/ft, chain-link $10-20/ft. Terrain, gate count, and whether you remove an existing fence or add decorative touches (privacy boards, lattice) push costs up further. For context, a 150-foot stretch with one gate often lands in the mid four-figure range before permit fees and labor add-ons.
- Design and measurements: precise layout and alignment to property lines.
- Permits and HOA coordination: who handles what, and any fees.
- Site prep and old fence removal: debris removal, soil grading, post extraction.
- Installation and hardware: posts, rails, gates, fasteners, and weatherproofing.
- Cleanup and final inspection: site restoration and sign-off.
- Warranty and maintenance guidance: length, coverage, and care tips.
Hidden or extra costs to anticipate include permit fees, HOA review charges, utility marking, and possible grading or drainage work to fit gates and line posts. See City of Tampa permits for context on permit processes.
Concrete example: for a typical Tampa home with 150 feet of wood privacy fencing and one gate, budget around $4,500-6,500 when you include old-fence removal and basic site prep; upgrading to vinyl could run $7,500-11,000 depending on gate design and HOA requirements.
Beyond the sticker price, consider trade-offs: wood delivers classic curb appeal but needs regular sealing and termite checks; aluminum and vinyl offer lower maintenance at higher upfront cost; choosing the right option for your climate and use case saves money over the life of the fence. For ongoing maintenance guidance on wooden fences, see wooden fence maintenance.
Takeaway: Start with an itemized bid that includes permitting, HOA coordination, and any old-fence removal, then lock in a realistic timeline that accounts for Tampa’s weather and HOA cycles.
Timeline and Milestones: From Permit to Perimeter
In Tampa, the fence installation timeline is anchored by two gating processes: permits and HOA approvals. Those approvals determine when you can actually begin site work, so your schedule should assume a conservative start date and build buffers for paperwork, not just the crew's labor.
- Design and measurements: finalize layout, gates, and setbacks; this is quick if you have a clear goal but can stretch if the property sits behind landscaping or a pool area.
- Permitting and HOA review: submit plans, address comments, and secure approvals; in Tampa this can take days to weeks depending on the HOA and city workflow.
- Material lead times and ordering: vinyl and aluminum often require longer lead times; wood can be faster but needs moisture-influenced scheduling.
- Site prep and old fence removal: clearing vegetation, marking utilities, and safely removing existing fencing adds days or a weekend.
- Installation and gate work: typically 1–3 days on standard lots, with longer windows for complex layouts or multiple gates.
- Final inspection, cleanup, and warranties: documentation arrives post-install; keep care and maintenance guidance handy.
Weather in the Tampa area and coordination with utility marking are the wild cards. A storm or delayed utility locates can push work days out, even if permits are already in hand. Build a risk buffer of one to two weeks into your plan if you’re coordinating with a home project or tenant move-in.
Concrete Example: A Tampa homeowner plans a 150‑foot wooden fence with two gates. HOA approval takes 10 business days, utility marking adds 3 days, and wood fencing requires a 2‑week lead time for material delivery. The crew then installs over two days, and the project wraps with a final walk-through a week later for warranty paperwork.
A practical insight: in practice the biggest slip is permit and HOA timing, not the actual labor. Treat approvals as the project gatekeeper, and align bid timelines with those milestones. If you can pair a quote with a confirmed start window once approvals clear, you’ll avoid exacerbating schedule creep.
Final takeaway: lock down approvals early, and schedule the installation to follow a confirmed start date; otherwise you’ll be chasing weather, permits, and HOA responses instead of focusing on a clean perimeter.
What to Expect from a Professional Fence Installer in Tampa
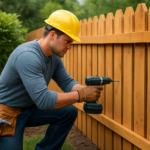
In Tampa, a professional fence installer does more than swing a hammer. They perform a site assessment, propose a design that matches your goals and the local climate, measure with precision, and manage the practicals that determine whether the fence stands the test of time. That means permits, HOA coordination if needed, utility locating, and a plan for drainage and grading that keeps the fence level over years.
A good installer brings a concrete plan to the table before any digging. They verify property lines, set batter boards, and show you a layout that aligns gate positions with sightlines and entrances. This avoids misaligned gates and trips hazards later.
- Site assessment and design tailored to your goals and local climate. Evaluates slope, drainage, privacy needs, pets, and maintenance expectations to propose panel heights and material choices.
- Accurate measurements and layout alignment, including post spacing decisions. The installer marks corners, checks for square, and uses string lines to ensure the fence follows the property line without crowding landscaping.
- Permit handling and HOA coordination insights; what the installer should manage for you. They submit plans, track required approvals, and keep you informed of any delays that affect start dates.
- Installation steps, safety considerations, and post install cleanup; what to inspect before sign-off. They protect landscaping, anchor posts correctly, and leave a clean, ground-safe site.
- Warranty, maintenance guidance, and ongoing support from the contractor. Expect a written labor warranty and practical care tips for the most common Tampa materials.
Concrete example: A Tampa homeowner needed a 120-foot privacy fence along a sloped yard. The installer performed a precise level check, recommended stepped panels to maintain privacy on grade, and coordinated with the HOA for approval while filing the required permit. The project wrapped in two days with a tidy site and a two-year labor warranty.
In practice, the right installer delivers a pre-installation checklist, a clear scope, and documented warranties. They should also provide maintenance guidance and a plan for post-install support, so you know who to call if a gate creaks or a panel settles. See wooden fence maintenance for practical care steps. Watch for claims that skip these steps; they usually cause cost creep and delays later.
Next step: arrange a no-obligation site visit to confirm scope, timeline, and permit needs before committing to a contract.
Choosing the Right Fence Type for Your Property
In Tampa, material choice drives long-term performance more than anything else. Humidity, termites, and coastal exposure mean you should look beyond price and aesthetics to maintenance, warranty, and local service support. The right fence type aligns with your goals and with local constraints like HOA rules and city codes, while balancing initial cost with life-cycle value.
Wood fences offer classic curb appeal and easy customization, but they demand ongoing maintenance and are more vulnerable to humidity-driven rot and termite pressure unless treated and sealed regularly.
Vinyl fences deliver low maintenance and color stability, performing well in humid climates, but higher upfront costs and limited repair options can bite if you have drainage or uneven terrain.
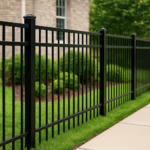
Aluminum and steel resist corrosion and require little upkeep, making them appealing for coastal properties; they can be pricey and offer less warmth or privacy than wood or vinyl.
Chain-link is the budget-friendly path and very durable; add privacy slats if you need screening, but expect less privacy and less aesthetic control.
Picket fences and decorative options shine when curb appeal matters, but they typically provide less security and privacy and are more maintenance-sensitive if wood is used.
A practical approach is to weigh privacy, security, maintenance, and neighborhood requirements together. For a backyard where kids and pets need containment with minimal upkeep, a maintenance-free vinyl or aluminum privacy option often beats wood on life-cycle cost. If you want a traditional look with maximum customization, wood remains compelling but plan for staining and treatment every couple of years.
Real-world use cases help anchor the decision: for a tight Tampa backyard by a pool, vinyl privacy can simplify maintenance and cleaning, while a waterfront commercial lot may justify powder-coated aluminum for resilience against salt spray and lower upkeep.
Example 1: A small Tampa backyard near a pool chooses a solid vinyl privacy fence for weather resilience and easy cleaning. The owner budgets for a high-quality gate and a color-matched post cap, and they secure a warranty that covers both labor and material.
Example 2: A mid-size commercial lot uses a powder-coated aluminum fence along the perimeter for durability against salt spray and low maintenance. It’s paired with privacy panels in high-visibility zones to balance security with aesthetics.
Local nuance matters: HOA guidelines and city codes can dictate height, style, and color; start with a design brief that captures desired look, maintenance tolerance, and the site’s drainage and utility layout. For a practical read on permits and city expectations, see Tampa City guidelines here. A pro like Vilo Fence can help with design decisions and coordinate permits when needed.
To optimize value, plan for life-cycle costs rather than initial price alone, and insist on a written breakdown that clarifies permits, removal of old fencing, installation scope, and warranty terms.
Take the next step by starting with a brief design outline and requesting bids that clearly compare life-cycle costs across materials, including permits, removal of old fencing, and warranty terms.
Permits, HOA Rules, and Local Nuances in Tampa
Permits, HOA approvals, and local nuances in Tampa shape every fence project more than you expect. In practice, the gating factor is paperwork, not material choice. City-permit requirements determine whether you can install a fence of a given height or in a certain setback, while neighborhood covenants can impose style, color, or visibility constraints. Don’t assume you can hang a panel and call it a day, even for a simple wooden fence. Real-world results show plans must be submitted, and your timeline will hinge on how quickly reviews move and how promptly an HOA responds. Your contractor should anticipate questions, prepare the necessary drawings, and keep you informed about delays before they derail the schedule. For local context, check Tampa city codes when starting this process Tampa city codes.
Permitting in Tampa varies by jurisdiction and fence type. Most projects require a permit if the fence exceeds a height threshold or encroaches on setbacks; even small changes can trigger reviews. HOA rules often sit on top of city codes and may demand drawings, material samples, or color swatches. Before you sign, confirm whether the installer will handle permits and HOA submissions, or if you must file independently. Remember to mark utilities—Call 811—before any digging Call 811. Utility marking adds a scheduling guardrail; if lines run along the property edge, you could incur delays or require trenching adjustments. A permit-ready plan also clarifies post placement, slope, and drainage considerations that affect long-term performance. If you want practical upkeep guidance after installation, see our Wooden fence maintenance.
Your installer should coordinate with the HOA when needed and provide a complete submittal package. Expect a site plan showing fence placement, gate counts, and materials; photos or samples illustrating the intended look; and a written scope that aligns with local requirements. In Tampa, getting ahead on documentation often halves back-and-forth with the board. A practical constraint: even with online submittals, you may see a 5–15 business day review window, and a delayed response can stall the start by weeks. Some neighborhoods require architectural reviews or color approvals; your contractor can bridge those conversations and keep you updated. Note that good installers build in a contingency for weather or utility coordination, not just labor.
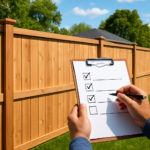
- Review CC&Rs and city code for fence height, setback, and required permits.
- Prepare a complete submittal: dimensioned site plan, fence type, gate details, and material samples.
- Schedule utility marking early and share the map with the installer.
- Ask the installer to handle HOA submissions if possible; get written timelines.
- Allow buffer time in your schedule for reviews and potential revisions.
Concrete example: A Tampa homeowner wants a 6-foot privacy fence in the backyard and needs HOA approval for the color and privacy slats. The city permit was straightforward, but the HOA required a sketch and a sample panel. Once the package was complete, the HOA approval arrived in about 10 days, and the project moved to permitting and scheduling without major back-and-forth.
Next steps: confirm with your chosen fence company who handles permits and HOA approvals, and insist on a written timeline. Proactively aligning these approvals prevents costly delays and keeps the project moving toward a clear start date.
Next Steps with Vilo Fence: Quotes, Scheduling, and What You Need to Know
Start with a clear, written plan you can carry into negotiations. A solid quote is not just a price; it should map the project scope, timeline, and responsibilities, including design tweaks, permit handling, and post-install care.
Bring these to your quote: property boundaries or a site plan, any HOA guidelines, photos of the area, a rough gate count, and your preferred material. If a contractor won’t discuss these up front, that is a red flag.
When you compare bids, weigh the total cost against what is included. A cheaper base price often hides add-ons like permit fees, utility marking, or site prep. Look for a single-point contact and a defined warranty window; material warranties vary by product.
Timeline wise, expect design and measurements to happen in the first week after you sign, material lead times to range from a couple of days to several weeks depending on the material, and installation to take 1–3 days on a typical lot. Weather and utility coordination can shift dates, so confirm a backup plan.
A professional installer does more than lay boards. They assess site drainage, suggest fence line adjustments for gates and access, handle permit submission and HOA coordination, verify post spacing for your chosen material, and provide a maintenance outline after completion.
Concrete example: In a suburban Tampa neighborhood, a homeowner chose a 150-foot wood privacy fence with two gates. The quote included design, measurements, HOA submission, and removal of an old fence. After signing, design and permits took about two weeks, material lead times added another week, and installation wrapped in two days once weather cooperated; the HOA approval timeline was the bottleneck.
To keep the process smooth, request a written timeline with milestones and a single point of contact. Ensure you have a copy of the warranty terms and a post-install care sheet. For maintenance, see our guide on Wooden Fence Maintenance and plan annual checks to catch warps, rotation, or coating wear early.
- Items to verify in bids: Total installed length, number of gates, hardware, and whether removal of old fencing is included.
- What is included in the base price vs. add-ons (permit fees, utility marking, site prep, grading).
- Who handles permits and HOA coordination, and what documentation you must provide.
- Warranty terms: duration, what is covered, and any exclusions.
- Timeline milestones: design, permits, material lead times, installation date, and final inspection.